As an Amazon Associate, I earn from qualifying purchases. When you purchase through links on my site, I may earn an affiliate commission. Here’s how it works.
The Temperance Crochet Angel is a graceful, self-standing design that works up quickly and beautifully without stiffening — perfect for holiday décor or keepsake gifting.
This pattern uses a 4 mm (G) crochet hook and a Medium [4] weight yarn (e.g., Red Heart Super Saver). With its seamless construction from head to dress base and elegant stitch texture, it’s a great project whether you’re relaxing with a movie or crafting for the season.
Why Crocheters Love My Angel Patterns
My angel patterns share a common yarn/hook setup and simple stitch structure, making it easy to build a matching collection. Crocheters appreciate them because:
They’re quick projects that require minimal yarn.
They use familiar stitches and clear instructions.
They can be personalized with bells, ribbons, hair, or tree topper options.
Temperance Crochet Angel Pattern
Supplies
Yarn: Red Heart Super Saver. 198 g (7 oz) and 364 yds (333 meters). Medium Aran Weight Yarn [4]. 100% acrylic. Machine washable and dryable.
Color: Soft White (E300B.0316)
Crochet Hook: 4.0 mm (G) was used for the entire project
Scissors, Yarn Needle, Stitch Marker and a small amount of Poly-Fil or scraps of white yarn to stuff the head
Finished Project Yardage: Crochet Angel: 15g (0.53 oz) and 33.5 yds (30.6 m)
HALO: Bowdabra Bow Wire – Color Gold (I used the 4 mm hook but you can use a smaller hook if you prefer – 2.25 mm works well for tight chain stitches)
Difficulty Level
EASY-INTERMEDIATE
Finished Size
6.5 inches tall (not including the halo), 4.5 inches wide when flattened and measuring the width of the skirt
Gauge
Not imperative but if your stitches have spaces between them that you can see through you need to go down a hook size (or two) until you are crocheting a more solid fabric.
You can substitute any yarn and hook for this stitch pattern – just remember when you substitute if your gauge is different, the finished size, and amount of yarn used for your project will also be different.
* to **– Repeat the instructions between the asterisks the number of times indicated. This repeat will contain multiple instructions.
[] – at the end of the row – the total number of stitches
() – important notes AND sets of stitches to be worked within one stitch, or space
Special Stitches
3-dc bobble
*Yarn over, insert hook into specified stitch, yarn over and pull up 1 loop. Yarn over and pull through 2 loops on your hook**. Rep from * to ** 3 times. Yarn over and pull through all 4 loops on your hook.
Temperance Video Tutorial (filmed Dec 2024 – coming soon!)
I demonstrated how to make one of my other Crochet Angel Patterns (Patience) in a full length YouTube Video Pattern Tutorial. You can view the video tutorial for the arms, wings pattern 2 and halo here:
This project is worked in continuous rounds. You will need to use a stitch marker so you do not lose your place.
Do not slip stitch to join at the end of rounds unless specified.
When you work the sc2tog decreases work under the front loop only (it makes the stitch less thick).
Ch 3 at the beginning of a round counts as 1 dc.
Do not work into slip stitches unless specified.
Add Temperance to your Ravelry Pattern Library here
Temperance Crochet Angel Pattern
You are beginning at the top of the Angel’s head and working in continuous rounds to the base of the dress, all in one piece.
Using your 4 mm (G) hook (or size required for gauge) and leaving an 8-10 inch yarn tail:
Angel Head
R1: Work 6 sc in a DMR. [6 sc]
R2: 2 sc in each sc around. [12 sc]
R3: *2 sc in the next st, 1 sc in the next st**. Rep from * to ** around. [18 sc]
R4-R6: 1 sc in each st around. [18 sc]
R7: *Sc2tog over the next 2 sts, 1 sc in the next st**. Rep from * to ** around. [12 sc]
I recommend you firmly stuff the head at this point.
R8: Sc2tog around. [6 sc]
R9: 1 FPsc in each st around. [6 FPsc]
R10: 1 sc and 1 FPsc in each st around. [6 sc, 6 FPsc]
Work from the head section without fastening off to the body section below.
Angel Body
R11: 1 sc in the first st, 2 sc in the next st, 1 sc in each of the next 5 sts, 2 sc in the next st, 1 sc in each of the next 4 sts. [14 sc]
R12: 1 sc in the first st, ch 3, sk 2 sts, 1 sc in each of the next 5 sts, ch 3, sk 2 sts, 1 sc in each of the next 4 sts. [10 sc, 2 ch3sp]
R13: 1 sc in the first st, 1 sc in the bl of each of the next 3 chs, 1 sc in each of the next 5 sts, 1 sc in the bl of each of the next 3 chs, 1 sc in each of the next 4 sts [16 sc]
R14: 1 sc in each st around [16 sc]
R15: *1 sc in each of the next 3 sts, 2 sc in the next st**. Rep from * to ** around. [20 sc]
R16: 1 sc in each st around. Sl st to the first st to join. [20 sc]
R17: Ch 1, 1 FPsc in each st around. Sl st to the first st to join. [20 FPsc]
R18: Ch 1, 1 sc in each st around. Sl st to the first st to join. [20 sc]
Continue working from the body to the Angel Skirt below, without fastening off.
Angel Skirt
R19: Ch 1, *1 sc in each of the next 4 sts, 2 sc in the next st**. Rep from * to ** around. Sl st to the first st to join. [24 sc]
R20: Ch 1, 2 sc in the first st, 1 sc in each of the next 4 sts, 2 sc in the next st. *1 sc in each of the next 5 sts, 2 sc in the next st**. Rep from * to ** around. [29 sc]
R21: *1 sl st in the FL of next st, 3-dc bobble in the FL of the next st**. Rep from * to ** around to the last st. 1 sl st in the FL of the last st. [15 sl st, 14 3-dc bobble]
R22: *3-dc bobble in the FL of the next st, 1 sl st in the FL of the next st**. Rep from * to ** around to the last st. 3-dc bobble in the FL of the last st. [14 sl st, 15 3-dc bobble]
R23-R26: Rep R21 and R22
Sl st to the first st to join.
R27: Ch 1, 1 BPsc in each st around. Finish off and weave in ends. [29 BPsc]
Angel Arms
Make 1.
Using your 4 mm (G) hook (or size required for gauge):
The arm is created in one piece; worked flat and then seamed on the long edges with a slip stitch seam. Once the arm is complete you thread it through the openings on either side of the angel’s body, being sure to keep an equal amount of “arm” on each side. You can whipstitch these in place if you wish – I did not. I simply used 2 small stitches to attach the hands together in a “prayer” pose.
R1: Ch 21, beg in 2nd ch from hook and work 1 sc in each across, ch 1, turn [20]
R2: 1 sc in each st across, ch 1, turn [20]
Fold the rectangle in half (between R1 and R2) and seam the long edges using a slip stitch seam, or whip stitch seam.
Finish off and weave in any remaining ends.
Wings
Make 2.
Using your 4 mm (G) hook (or size required for gauge):
R1: Work ch 3 (counts as 1 dc), 2 dc, ch 2, 2 dc in a DMR. Turn. [5 dc, ch2sp]
R2: Ch 4 (counts as 1 tr) and 2 tr in the first st, 2 dc in the next st, 3 hdc in the ch2sp, 1 hdc in the next st, 1 sl st in each of the next 2 sts. Ch 1, turn. [3 tr, 2 dc, 4 hdc, 2 sl st]
R3: Sk the first sl st, 1 sc in each of the next 5 sts, 1 hdc in the next st, 1 dc in each of the next 2 sts, 2 tr in the next st and 1 dtr in the next st, (the ch 4 at the beg of R2). Ch 1, turn. [1 dtr, 2 tr, 2 dc, 1 hdc, 5 sc]
R4: 1 sl st in each st and around the row edge back to the DMR. Finish off. [15 sl st]
To attach the wings use a whip stitch and position them in the center at the base of her neck.
Halo
The Halo is made using a 4 mm (G) hook and Gold (or silver) Bowdabra Bow Wire.
What is Bowdabra Bow Wire? This is a thin piece of wire wrapped in gold metallic thread. I found mine at Michael’s in the ribbon section. It can stand on its own which is why I like it – and it is much thinner than pipe-cleaner (which was what I had been considering).
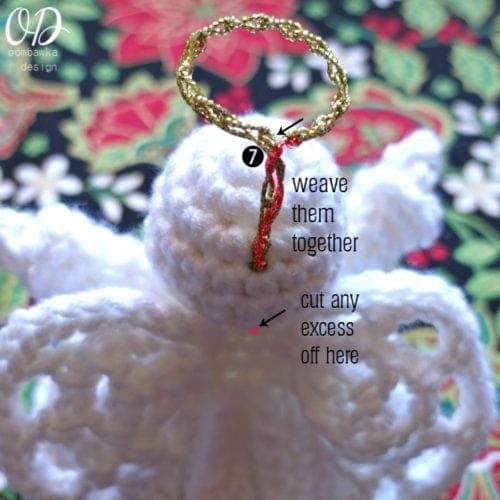
I crocheted the halo like this:
Ch 20, finish off leaving a tail of the bow wire. Now take the tail and thread it through the 7th chain from the opposite end. This will create the halo loop. Now twist (like a twist-tie) the two remaining ends together to make it straight and stiff. Take that one end (since you twisted them together you have one wire now) and thread it through the back of the angel’s head and down to the base of the neck before cutting off any of the excess wire. If you want to dab a bit of fabric glue in there to keep it in place you can.
If you’d like to keep a copy of this pattern for later or print it to use while crocheting, here’s how you can do that:
How to Print or Save This Pattern
Tip: Click the printer icon at the top of this post to print or save a copy of the pattern for your personal use. You can choose to save it as a PDF or print it out to keep beside you while you crochet.
Crocheters Often Ask
Q: Does Temperance need stiffening to stand?
A: No. This angel is designed to stand on her own without stiffening, just like my other designs.
Q: How much yarn will I need?
A: One angel uses about 15 g (33.5 yds) of yarn — one full skein makes approximately 11 angels.
Q: Can I substitute a different yarn or hook?
A: Yes. You may use any medium weight [4] yarn, but be aware your finished size and yardage may vary depending on gauge.
Q: How long will the project take?
A: Most crocheters complete the angel in just a few hours — ideal when you’re short on time but want a special handmade item.
The Temperance Angel is a small project with a graceful result — quick to make, straightforward to follow, and beautiful to gift or display. May she bring elegance and comfort to your home or to someone you care about.
Happy crocheting!
Join the Oombawka Design Crochet Facebook Group! Share your project photos, ask questions, and connect with other crocheters using Oombawka Design Crochet patterns and tutorials. We’d love to see your progress and finished makes! Join us here.
Curated Crochet Essentials Visit my Amazon shop for a handpicked selection of crochet tools, books, and kits.
Love Furls Crochet? Use my discount code OOMBAWKA2025 to receive 15% off the Furls Crochet Collection. Limit 1 use per customer. Expires December 31, 2025.
Love Shady Lane Original Crochet Designs? Use code OOMB for 15% off any pattern on the Shady Lane website, or code OOMBAWKAin her Etsy Shop. Expires December 31, 2026.
Rhondda Mol is the crochet designer and blogger behind Oombawka Design Crochet. Since 2012, she has been sharing free crochet patterns, tutorials, and expert tips to help crocheters of all levels succeed. With more than 600 published patterns, Rhondda focuses on creating clear instructions and resources to inspire creativity and confidence in the crochet community.
Hi Tina, there is an error in the pattern as written. I’m going to update it this weekend. Thank you for reaching out to ask the question. Best, wishes, Rhondda
Hi Tina, to be sure I’m going to need to rework this but I’m pretty sure it is right as written – I think the bobbles space themselves out because we are working in a spiral. We work bobbles into the fl of the slip stitches and slip stitches in the front of the bobbles. I will try to work this up tonight to double check though and answer again once I know for sure. Thanks!! Rhondda
hopefully someone will answer as its been a few years since published, so I do round 21, ending on a bubble, the next stitch (start of round 22) says a bobble but this then leaves me with 2 bobbles next to each other , if I slip stitch the first stitch it will make a bobble on a bobble which I’m sure it’s not meant to be … help please
Hi Anne, You are SO welcome. I’m so happy you like the Angels. Thank you for making a difference in the lives of others by giving them the Angels you crochet. I’m happy to hear they bring them some comfort. xo Rhondda
Thank you for another beautiful Angel and for sharing the patterns. I love making these angels to give to people who have illness and or sadness in their lives, they bring joy and hope.
Hi Maj-Britt, for R21 we work 1 slip stitch into the front loop of the first stitch. In the front loop of the next stitch we work the 3-double crochet bobble stitch. We repeat these 2 stitches all the way around for R21. After you work R22 and you work the slip stitches into the bobbles, it makes them look tighter and more textured. It might just be you need to work 1 more round to have them hold their shape. Let me know if this helps! All the best, Rhondda
I Love This Angels, but i dont understand
R20: *1 sc in each of the next 5 sts, 2 sc in the next st**. Rep from * to ** around. [28 sc]
R21: *1 sl st in the FL of next st, 3-dc bobble in the FL of the next st**. Rep from * to ** around. [14 sl st, 14 3-dc bobble]
I have make rund 20, but it dont look right in rund 21
can you help me – sorry for my english
She is lovely!